Home / Resources / Strategy library / EMA trend following
Strategy library · Education only
EMA trend following: join the trend on a pullback, leave when it breaks.
Two exponential moving averages decide the direction; a pullback to the faster one is the entry; the first close past the slower one is the exit. Here are the rules, two real MNQ sessions, and what a trailing exit does to a trailing drawdown.
Unlocked. Your link is on its way by email. Jump to the full breakdown ↓
The full breakdown · free with your email
Unlock the full EMA trend following breakdown
The rule card, a real trend day on MNQ, a real day of two quick stops, and what the trailing exit gives back under a trailing drawdown. The free overview is below; we also email you the link, so it is one tap away next time.
What is EMA trend following?
EMA trend following uses exponential moving averages (EMAs) to decide which way the market is trending, then trades only in that direction. An EMA is an average of recent closes that gives more weight to the newest ones, so it turns faster than a simple average. With two of them, a fast one and a slow one, the trend is up while the fast EMA is above the slow one and down while it is below.
A common intraday pair is the 9 and the 21 EMA on 5-minute bars. Traders use the cross of the two
as a trend filter, and a pullback to the fast EMA as the place to join the trend.
What is the EMA trend following strategy?
The version on this page turns that into rules. While the 9 EMA is above the 21, it waits for a 5-minute bar to dip to the 9 EMA and close back above it, higher than it opened, and buys that close; the mirror for shorts. The stop goes one tick past the setup bar. There is no fixed target: the trade stays open until the first 5-minute close on the other side of the 21 EMA. That last rule is what makes it trend following. It lets a trend run as long as it lasts, and it gives back part of the open profit every time.
It is not the same as an EMA crossover strategy, which enters every time the two lines cross. Here the cross only sets the direction; the entry waits for a pullback.
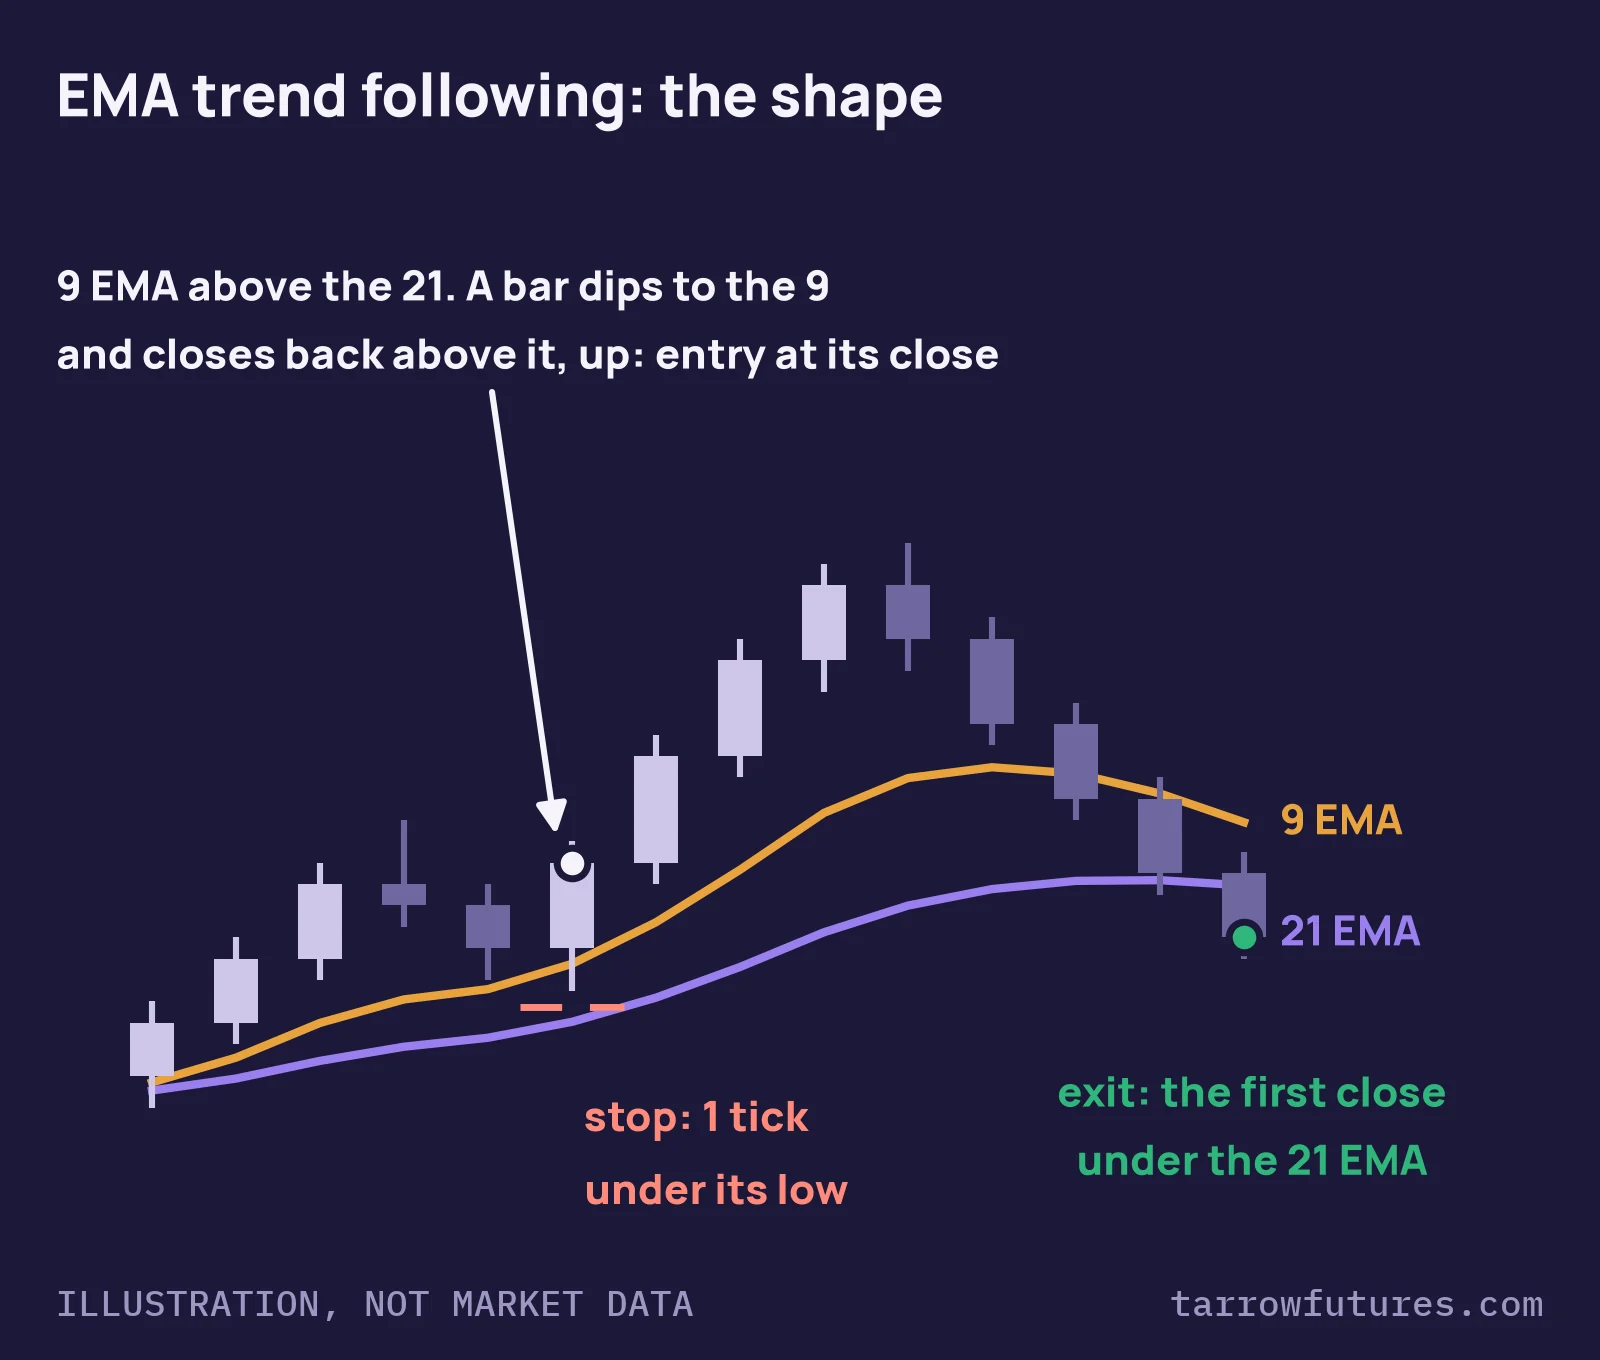
The idea in five lines
- Trend: the 9 EMA above the 21 EMA on 5-minute closes means longs only; below means shorts only.
- Setup: a bar dips to the 9 EMA and closes back above it, higher than it opened (shorts: the mirror). Bars from
10:00to13:55ET. - Entry and stop: the setup bar's close; the stop one tick past the bar, at least
10points away. - Exit: the first 5-minute close on the other side of the 21 EMA. No fixed target.
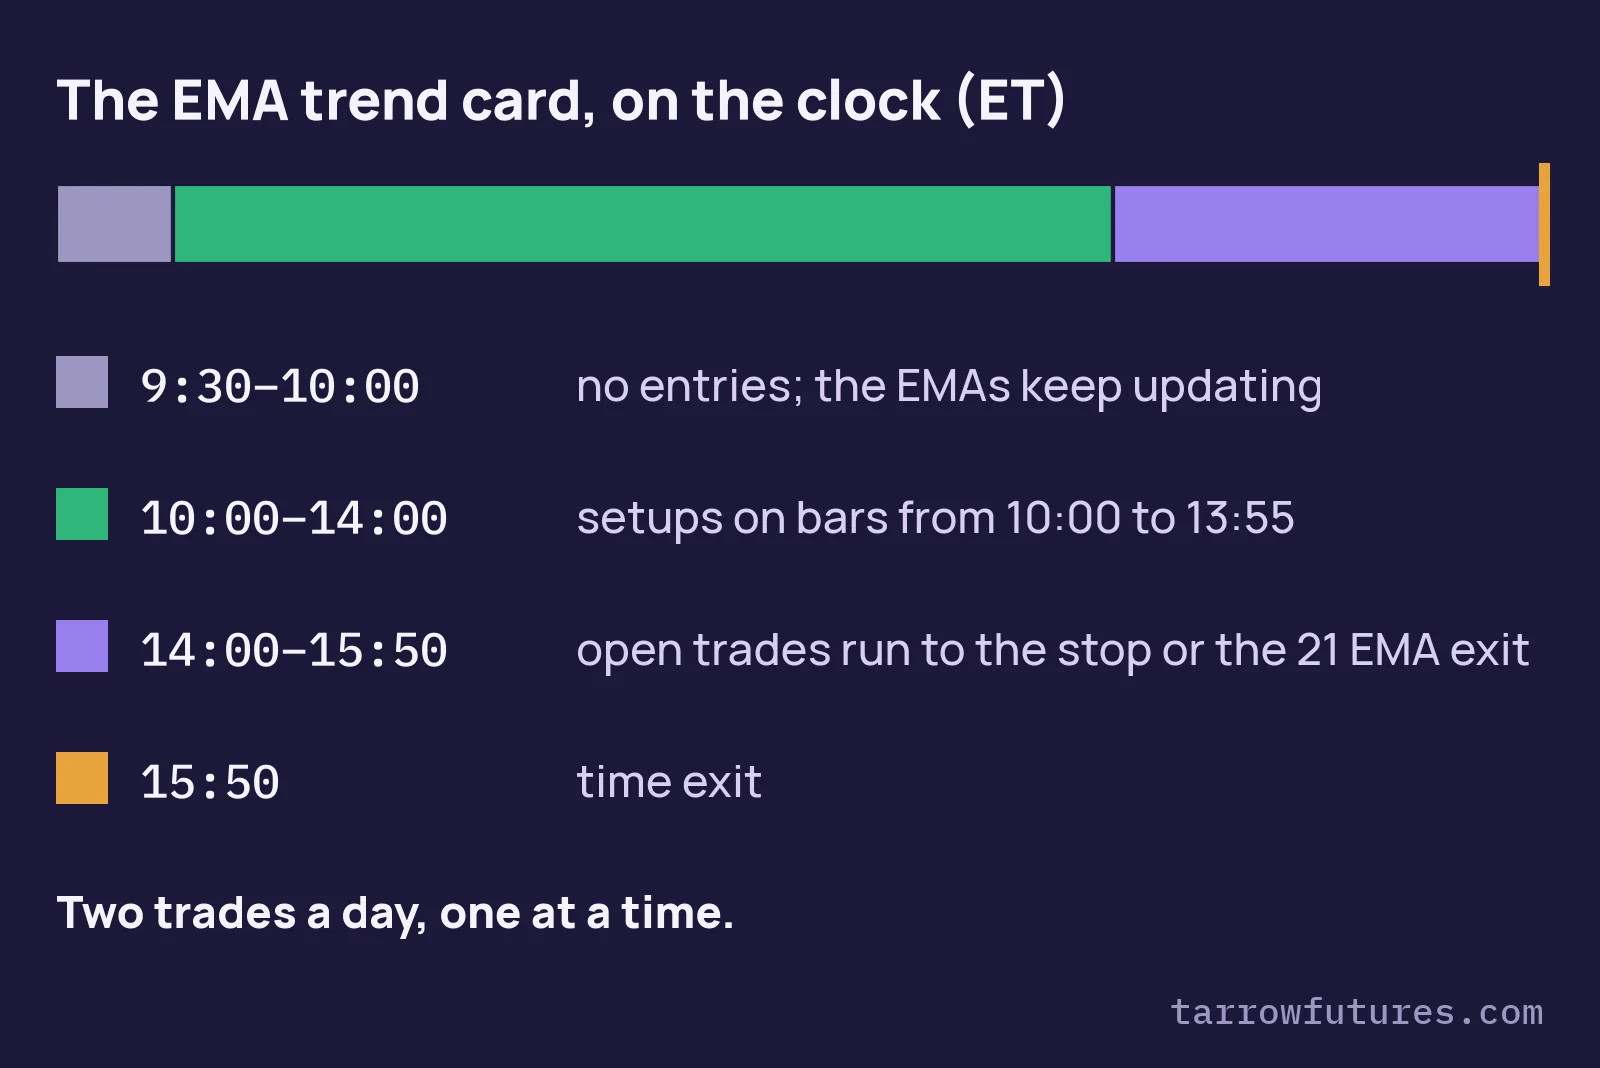
- Limits: one trade at a time, two a day; flat at
15:50ET.
Each choice changes the strategy. The 9 and 21 are one common pair; 20 and 50 is another. A fixed target is another common exit. We teach this version as a worked example of the rules; that is not evidence it is profitable.
Why it is hard to trade inside a prop account
Trend following needs trend days, and on a sideways day the two EMAs lie flat and tangle together. A pullback that looks
like a setup is just noise, and the stop is hit within minutes. On the failed MNQ session in the full breakdown, both
trades the card allows were stopped by 10:20 ET. The trailing exit has its own cost: on the day it worked, open
profit peaked 96.25 points above the exit, and an intraday trailing drawdown counts that peak.
What is in the full breakdown
- The rule cardExact EMA settings, trend, setup, entry, stop, exit and time rules, written so you could code them.
- A real session where it workedMNQ, 27 Oct 2026, 5-minute chart: a long from the 9 EMA held for over two hours, then a second long stopped.
- A real session where it failedMNQ, 28 Oct 2026: two longs stopped within twenty minutes as the EMAs went flat.
- Prop-rule fitDaily loss limit with two trades a day, the open profit a trailing exit gives back, and consistency, worked in numbers.
- A test-it-yourself planHow to backtest and stress-test it before it costs you an evaluation.
The full breakdown · free with your email
EMA trend following: rules, real charts, prop-rule fit
Preview below. Unlock it at the top of the page ↑ and it opens here.
1. The rule card
EMA trend following, 9 and 21 EMA, 5-minute bars
- Chart. 5-minute bars of the regular session (
9:30ET onward), with a9and a21exponential moving average of the close. The EMAs run on from the previous session's bars; they do not restart each morning. - Trend. At the close of a bar, the trend is up if the 9 EMA is above the 21 EMA, and down if it is below.
- Window. Setups count on bars that start from
10:00through13:55ET, so the last entry is at14:00. - Long setup. Trend up; the bar's low reaches the 9 EMA or goes below it; the bar closes above the 9 EMA and higher than it opened.
- Short setup. The mirror: trend down; the bar's high reaches the 9 EMA or goes above it; the bar closes below the 9 EMA and lower than it opened.
- Entry. The close of the setup bar.
- Stop. One tick (
0.25) past the setup bar's low (long) or high (short). At least10points from the entry. - Exit. No fixed target. A long exits at the close of the first bar that closes below the 21 EMA; a short at the first close above it. If the stop trades in a bar, the stop counts first.
- Limits. One trade at a time, two a day; a new setup must come after the bar that closed the last trade. If the trade is still open at
15:50ET, exit then. - Size. Contracts = the money you allow per trade ÷ (stop distance in points × the contract's point value), rounded down. If one contract is already more than you allow, there is no trade.
Rule 8 is the trend-following part. A fixed target caps the winner; an exit on the 21 EMA lets it run for as long as the
trend holds, and gives back the distance from the best price to the first close under the line. Rule 9's cap of two is what
ends a choppy day. Point values come from CME Group's contract specs: MNQ is $2 a point, NQ $20.
Our examples use micros. The EMAs on our charts are TradingView's built-in exponential moving average, 9 and 21 on the
close.
2. A session where the rules worked
Real chartSelected example, chosen to show the rulesTrend caught
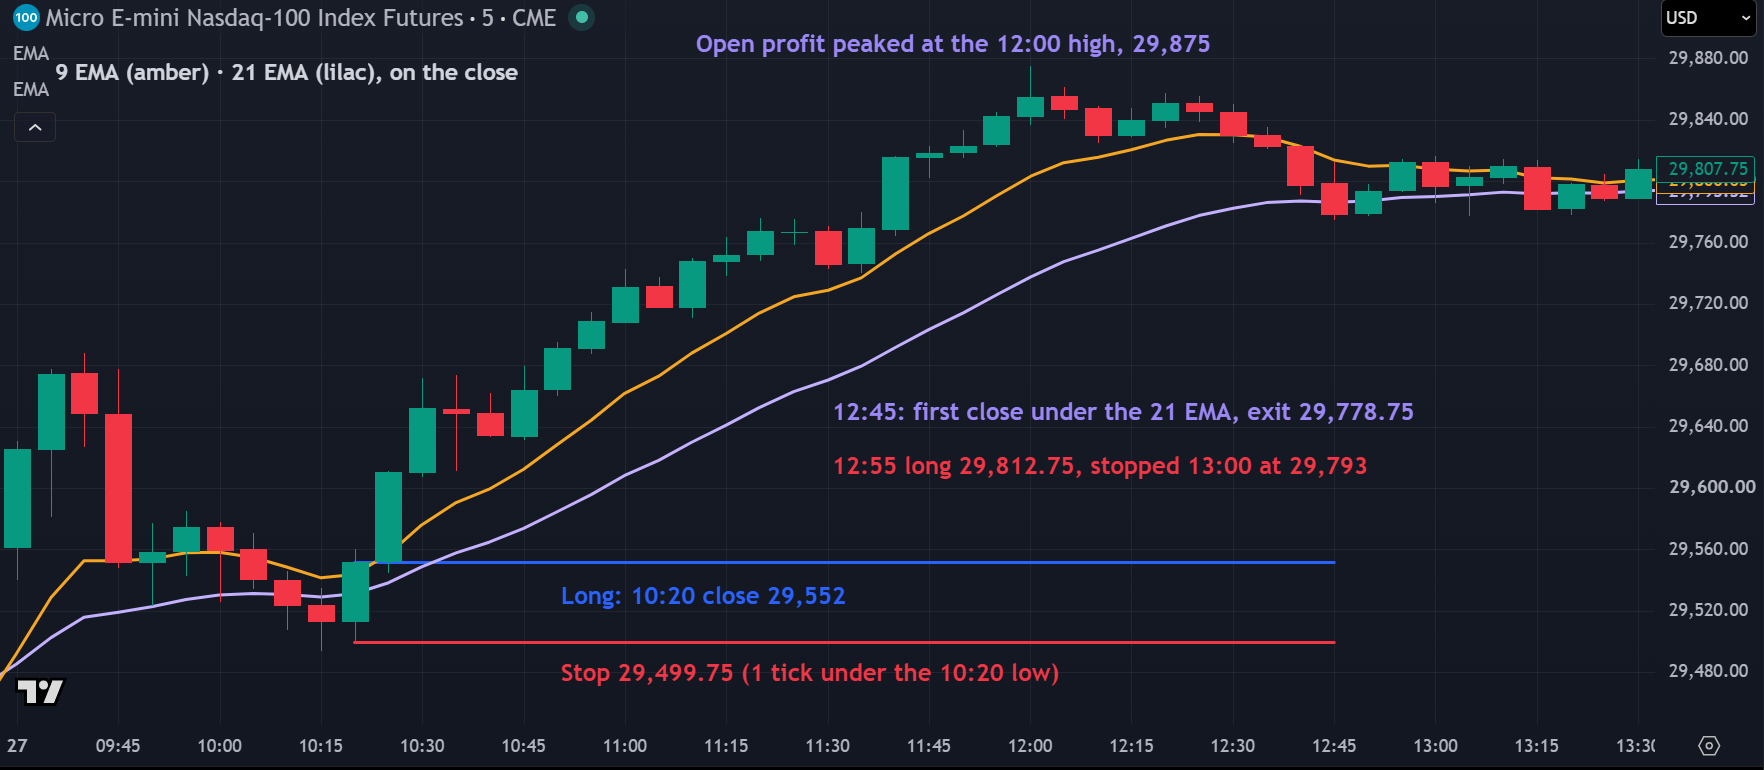
| Step | What the chart shows | Number |
|---|---|---|
| Trend | At the 10:20 close, 9 EMA 29,543.59, 21 EMA 29,531.09 | up: longs only |
| Trade 1 | 10:20 bar: low 29,500, under the 9 EMA; opened 29,513.25, closed above the 9 EMA | long 29,552 |
| Stop | One tick under the bar's low | 29,499.75 (52.25 pts, $104.50 per MNQ) |
| Best price | 12:00 bar high | 29,875, +323 pts open |
| Exit | 12:45 bar closed at 29,778.75, under the 21 EMA (29,786.33) | +226.75 pts, 226.75 × $2 = $453.50 per MNQ |
| Trade 2 | 12:55 bar: low 29,793.25 under the 9 EMA (29,810.39), closed 29,812.75, up | long 29,812.75, stop 29,793 (19.75 pts) |
| Outcome | 13:00 bar traded down to 29,785.75 | stopped: 19.75 × $2 = −$39.50 per MNQ |
| Day | Two trades, the cap | +207 pts, $414 per MNQ |
Read the chart from left to right. After a jump at the open, price fell for forty minutes, and by 10:15 the
9 EMA was only about 12 points above the 21. The 10:20 bar dipped under the 9 EMA and closed well
above it: a long. Price then climbed until noon without a single close under the 21 EMA. It topped at 12:00, drifted, and the 12:45 bar closed
under the 21 EMA, which ended the trade 96.25 points below the best price. Ten minutes later the trend was still
up on the EMAs, so a second setup came, and it was stopped on the next bar. Dollar figures are per micro contract, before
commissions and slippage. Hypothetical: what the written rules would have done that day, not trades anyone placed (CFTC Rule
4.41 notice below the next example). The same session is the failed example in our
range trading breakdown: the day the range broke was the day the trend
ran.
3. A session where the same rules failed
Real chartSelected example, chosen to show the rulesTwo stops
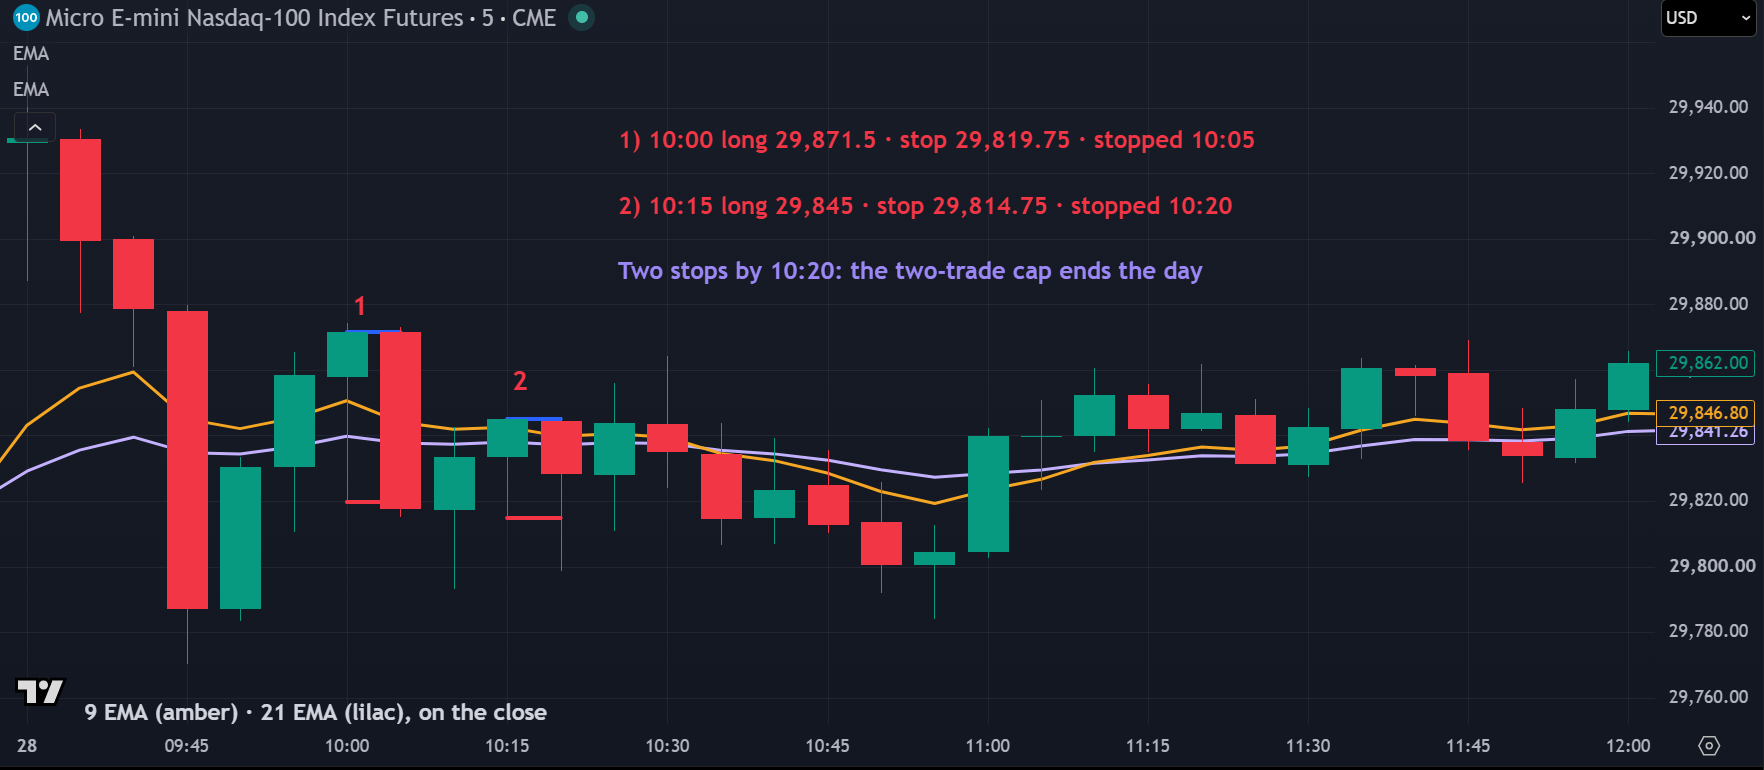
| Step | What the chart shows | Number |
|---|---|---|
| Trend | At the 10:00 close, 9 EMA 29,850.61, 21 EMA 29,839.74 | up, by 10.87 pts |
| Trade 1 | 10:00 bar: low 29,820, under the 9 EMA; opened 29,858.25, closed higher | long 29,871.5, stop 29,819.75 (51.75 pts) |
| Outcome | 10:05 bar traded down to 29,815.25 | 51.75 × $2 = −$103.50 per MNQ |
| Not a setup | 10:10 bar dipped under the 9 EMA but closed under it, at 29,833.50 | no trade |
| Trade 2 | 10:15 bar: low 29,815, opened 29,833.75, closed 29,845, above the 9 EMA (29,842.54) | long 29,845, stop 29,814.75 (30.25 pts) |
| Outcome | 10:20 bar traded down to 29,798.50 | 30.25 × $2 = −$60.50 per MNQ |
| Day | Cap of two reached at 10:20; at 10:35 the 9 EMA crossed under the 21 | −82 pts, −$164 per MNQ |
On paper the trend was up: the 9 EMA sat above the 21 at both entries. But the gap was about ten points at 10:00 and four points at 10:15, and both lines were flat. The EMAs had carried the up-trend over from the previous afternoon; the morning itself was going sideways. A pullback to the 9 EMA in a flat market is just a bar in the middle of a range, and both stops were hit on the very next bar.
Two rules kept it to two stops. The stop sat one tick past the setup bar, so each loss was known before the entry. And
the cap of two trades ended the day at 10:20. Without it, the same rules would have kept finding "pullbacks"
as the lines crossed back and forth through the late morning.
Size from the stop. With $200 a trade (example budget), rule 10 gives $200 ÷ $103.50 = 1.93,
rounded down to 1 MNQ for the first trade, and $200 ÷ $60.50 = 3.31, so 3 MNQ for
the second: $103.50 + $181.50 = $285 in twenty minutes. Could a minimum gap between the EMAs, or a slope
filter, have kept you out? We have not tested one and do not offer one. Test any filter on many sessions before trusting
it.
CFTC Rule 4.41: Hypothetical or simulated performance results have certain limitations. Unlike an actual performance record, simulated results do not represent actual trading. Also, since the trades have not been executed, the results may have under- or over-compensated for the impact, if any, of certain market factors, such as lack of liquidity. Simulated trading programs in general are also subject to the fact that they are designed with the benefit of hindsight. No representation is being made that any account will or is likely to achieve profit or losses similar to those shown.
4. How it fits prop firm rules
Daily loss limit: two trades means two stops can happen
Size each trade from its own stop, then check the worst day, not the average one. Example figures: with $200 a
trade, the 27 October first long is $200 ÷ $104.50 = 1.91, so 1 MNQ; the second long's stop was
only 19.75 points, so $200 ÷ $39.50 = 5.06 gives 5 MNQ, a $197.50 loss.
Sizing from the stop makes every stop cost about the same, whatever its width. With two trades a day, the worst day on the
card is two stops, up to $400 at that budget. Put that against your daily loss limit before the first trade.
Trailing drawdown: the exit gives back open profit, and the floor keeps it
A trailing exit never sells the top. On 27 October, at 1 MNQ, the long was +323 points open
(+$646) at the 12:00 high and closed at +226.75 (+$453.50). Under an
intraday trailing drawdown, the floor follows your highest balance, open trades included. Example figures, not results: if
that trade started at a balance high and the floor was still trailing, it lifted the floor $646 and the balance
$453.50, so the room between them shrank by $192.50 on a winning trade. Under an end-of-day
trailing drawdown, only the closing balance counts.
Consistency rule: a trend day can be your whole month
Trend following earns most of its points on a few days like 27 October. Example figures: at 1 MNQ that day was
$414. Under a consistency rule that caps your best day at half of total profit (example rule), a
$414 best day needs total profit of at least $414 × 2 = $828 before it fits. Rules differ by firm;
check yours.
Close-out time
The card's 15:50 ET exit is ours. Many firms set their own time by which positions must be flat; if yours is
earlier, it becomes the time exit. Check your firm's current rulebook.
5. Test it yourself before you trade it
- Write the card down exactly. Bar size, session, EMA lengths and source, whether the EMAs carry over from the previous session, what "reaches the 9 EMA" means, the stop and the minimum stop, the exit rule, the two-trade cap and the time exit. If two people could code it differently, it is not finished.
- Backtest it on your contract, many sessions. Record each setup, the stop distance, the best price while open, the exit and the outcome. The best price matters: it is what your trailing drawdown sees.
- Look at the flat days. Count the days where both trades were stopped, and how often the EMAs were less than a few points apart at the entry. That is where trend following pays for its trend days.
- Add costs. Commission both ways and slippage on every fill, including the exits at the close of a bar, which are market orders.
- Run your size through the rules. Two stops a day × risk per trade against your daily limit, the open profit given back against your trailing drawdown, your best day against any consistency rule, then forward-test on a simulator for weeks before any paid evaluation.
Know a trader learning this strategy? Send them this breakdown. It's free for them too.
Disclosures
Education only. This page explains how a widely known, public strategy is defined and how you could test it yourself. It is not advice, not a recommendation to trade any contract, size or strategy, and not a signal: it shows no setup for any future session. Charts are real past sessions, chosen to show the rules (including a day they failed); they are selected examples, not typical results. The charts are TradingView snapshots (MNQ1!, regular trading hours, one-minute unless the caption says otherwise; a volume profile, where shown, is TradingView's built-in Fixed Range Volume Profile); diagrams labelled as illustrations are drawn by Tarrow Futures and are not market data. The level, range, entry, stop and target marks and labels on them were added by Tarrow Futures. Bars may differ slightly from those on your platform. Trade outcomes on this page are what the written rules would have done on those days, before commissions and slippage. They are not trades Tarrow Futures placed. Dollar figures for sequences and rules are example figures, not results. Prop firm rules differ and change; your firm's current rulebook decides. Futures trading involves substantial risk of loss. Automation does not remove risk.
CFTC Rule 4.41: Hypothetical or simulated performance results have certain limitations. Unlike an actual performance record, simulated results do not represent actual trading. Also, since the trades have not been executed, the results may have under- or over-compensated for the impact, if any, of certain market factors, such as lack of liquidity. Simulated trading programs in general are also subject to the fact that they are designed with the benefit of hindsight. No representation is being made that any account will or is likely to achieve profit or losses similar to those shown.